
WordPress is one of the most popular platforms for both web development and search engine optimization. WordPress offers a variety of SEO plugins to make On-Page SEO smooth and faster.
WordPress On-page SEO encompasses multiple factors, including keyword research, URL structure, title tags, meta descriptions, header tags, image optimization, internal linking, user experience, schema markup, and more. Each element plays a crucial role in enhancing your website’s search engine visibility and overall performance.
SEO-Friendly WordPress Themes
Selecting a SEO-friendly WordPress theme is the first step in optimizing on-page SEO for WordPress. Here is a list of popular SEO friendly theme to consider:
1. Divi WordPress Theme: Divi is a versatile and responsive theme that allows users to build custom layouts without coding. Its clean code and mobile responsiveness contribute to better SEO performance.
2. Astra WordPress Theme: Astra is a lightweight and fast-loading theme that offers excellent compatibility with SEO plugins. Its design flexibility and performance optimization make it a popular choice for SEO-conscious users.
3. GeneratePress WordPress Theme: GeneratePress is a lightweight and user-friendly theme that prioritizes speed and clean code. Its simplicity and SEO-friendliness make it an excellent option for various websites.
Contact us today and let our team of top-notch SEO experts help you reach the top!
Utilizing SEO Plugins in WordPress
WordPress provides a wide range of SEO plugins that simplify the implementation of on-page SEO elements, even for users with minimal technical expertise.
What Do Seo Plugins Do?
SEO plugins offer a suite of tools and features to help you optimize your website for search engines. From content analysis to sitemap generation, these plugins streamline the SEO process and ensure you’re adhering to best practices.
Popular SEO Plugins For WordPress
1. Yoast SEO: Yoast SEO is the most popular SEO plugin for WordPress. It allow you to set-up meta title, description, XML sitemap and lots more.
2. Broken Link Checker: It is very important to remove dead links that generates 404 header code from your website. This plugin scans your website to find all the dead links and help to eliminate them.
3. Rel NoFollow Checkbox: This plugin allows you to add the nofollow attribute to specific outbound links, preserving your website’s link equity and avoiding potential penalties.
4. Redirection: The Redirection plugin helps you manage 301 redirects, essential for preserving SEO value when URLs change or pages are removed.
5. Internal Link Juicer: This plugin automatically adds internal links to your content, improving site navigation and distributing link authority throughout your website.
How To Install Plugins In WordPress
Install Plugins from the WordPress Plugin Repository:
- Log in to your WordPress Admin section:
- Go to your website’s URL (e.g., https://www.yourwebsite.com/wp-admin).
- Enter your username and password to log in to the WordPress dashboard.
- Navigate to the Plugins Page:
- Once logged in, click on “Plugins” in the left-hand sidebar.
- Click on “Add New”:
- On the Plugins page, click on the “Add New” button at the top.
- Search for a Plugin:
- In the search bar on the Add Plugins page, type the name or keywords of the plugin you want to install (e.g., “Yoast SEO” or “Contact Form 7”).
- Install the Plugin:
- After finding the plugin you want to install, click on the “Install Now” button next to its name.
- WordPress will download and install the plugin for you.
- Activate the Plugin:
- Once the installation is complete, the “Install Now” button will change to “Activate.”
- Click on the “Activate” button to activate the plugin on your website.
- Configure the Plugin (if necessary):
- Some plugins may require additional configuration or setup.
Creating SEO-Friendly URL Structures
An SEO-friendly URL structure contributes to better search engine visibility and user experience. Follow these steps to set up SEO-friendly permalinks in WordPress:
1. Navigate to Settings > Permalinks in the WordPress dashboard.
2. Choose a permalink structure that includes relevant keywords and is easy to read for both users and search engines.
3. Avoid using parameters and symbols in your URLs, as they can be confusing to search engines and users.
Optimizing Title Tags and Meta Descriptions Using Yoast SEO
Title tags and Meta descriptions are critical on-page SEO elements that appear in search engine results. Yoast SEO simplifies the optimization process with real-time analysis and character limits for title tags and meta descriptions.
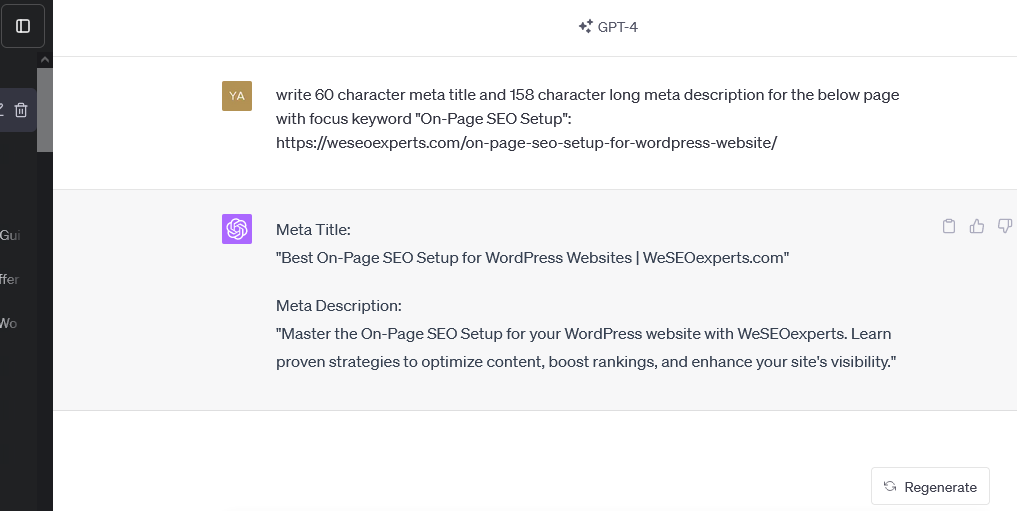
ChatGPT to generate Meta Title and Description
Open ChatGPT prompt – https://chat.openai.com/ and use below command to generate SEO friendly Meta Title and Description for each of the pages:
Write 60 character meta title and 158 character long meta description for the below page with focus keyword “On-Page SEO Setup”:
https://weseoexperts.com/on-page-seo-setup-for-wordpress-website/
Using Header Tags Effectively in WordPress
Header tags (H1, H2, H3, etc.) are essential for organizing your content and signaling its structure to search engines. Use header tags effectively to create a hierarchical content layout and enhance the readability of your articles.
Image Optimization for SEO in WordPress
Image optimization is crucial for faster page loading times and better user experience. Follow these steps to optimize images on your WordPress website:
1. Use TinyPNG.com or other image compression tools to reduce image file sizes while maintaining image quality.
2. Add descriptive alt text and filenames to help search engines understand the content of your images.
3. Adjust image size and dimensions to ensure responsiveness on various devices.
Utilizing Internal Linking in WordPress
Internal linking is a powerful SEO strategy that helps search engines discover and index more of your content. It also distributes link authority throughout your website, improving overall SEO performance.
Enhancing User Experience (UX) in WordPress
User experience and SEO are closely intertwined. Prioritize the following aspects to enhance user experience on your WordPress website:
1. Mobile Responsiveness: Be sure to test your website on here https://search.google.com/test/mobile-friendly to find if the website is mobile-friendly across different devices. A mobile-friendly website ensure that the pages will render correctly on any mobile device.
2. Page Speed Optimization: Using this tool https://pagespeed.web.dev/ – you should check that the website is optimized for high performance by minimizing page load times and eliminating unnecessary elements.
3. Intuitive Navigation: Create a user-friendly navigation structure that allows visitors to find information easily.
Utilizing Schema Markup in WordPress
Schema markup is a powerful tool for providing additional context to search engines about your content. Implement schema markup for various content types, such as articles, recipes, events, and more, using schema plugins and tools.
Optimizing Meta Tags for Social Media
When it comes to directing visitors to your website, the influence of media outlets like Twitter and Facebook cannot be overlooked. To make sure your content stands out on these platforms, add Optimized Graph and Twitter Card tags. This will not only enhance the visual appeal of what you post but also amplify chances of people interacting with it.
Managing Outbound Links in WordPress
Outbound links are essential for building credibility and authority, but you may want to use the nofollow attribute for specific links to prevent search engines from passing link authority to external sites. Use the Rel NoFollow Checkbox plugin to easily add the nofollow attribute to outbound links when necessary.
Configuring Google Analytics in WordPress
Having an understanding of your website’s performance is essential in optimizing SEO efforts. With the help of setting up specific tracking tools, such as with the use of the popular resource, ‘Goolge Analytics’, you can access valuable data about your WordPress website from user behavior to conversions rates. This will assist you in creating a more informed on-page SEO strategy.
Setting up Google Analytics 4 (GA4) in WordPress involves a similar process to setting up the traditional Universal Analytics version. However, there are some differences in the tracking code and setup procedure. Follow these steps to set up Google Analytics 4 in your WordPress website:
Step 1: Create a Google Analytics 4 Property
- Go to the Google Analytics website (https://analytics.google.com/) and sign in using your Google account credentials. If you don’t have a Google account, you’ll need to create one first.
- Click on “Start for free” to begin the setup process.
- You’ll be prompted to create an “Account Name” (use your website name or company name) and set up “Data Sharing Settings.” Make your selections, and then click on “Next.”
- In the next step, choose between a “Web” property or an “App + Web” property. Select “Web” for setting up Google Analytics 4 for your WordPress website.
- Enter your website’s name, URL (e.g., https://www.example.com), select your industry category, and choose your timezone. Click on “Create” to proceed.
- You’ll be presented with the Google Analytics 4 tracking code snippet. This code is what you’ll need to integrate with your WordPress website. Keep this code handy for the next step.
Step 2: Integrate Google Analytics 4 with Your WordPress Website
To add the Google Analytics 4 tracking code to your WordPress website, we’ll use a plugin called “Insert Headers and Footers”:
- In your WordPress dashboard, go to “Plugins” > “Add New.”
- Search for “Insert Headers and Footers” and click on “Install Now” next to the plugin.
- After installing, click on “Activate” to activate the plugin.
- In the WordPress dashboard, go to “Settings” > “Insert Headers and Footers.”
- Paste the Google Analytics 4 tracking code snippet you obtained in Step 1 into the “Scripts in Header” section.
- Click on “Save” to apply the changes.
Step 3: Verify Google Analytics 4 Installation
To ensure that Google Analytics 4 is installed correctly on your WordPress website, follow these steps:
- Go back to your Google Analytics account and navigate to the “Realtime” section.
- Open your WordPress website in a new browser tab.
- In the “Realtime” section of Google Analytics, you should see activity on your website in real-time. This indicates that the installation was successful.
Please note that data in Google Analytics 4 may take some time to populate fully, and it may not include historical data from before the setup.
Configuring Google Search Console
Google Search Console is another essential tool for monitoring your website’s performance in Google search results. Use it to identify indexing issues, monitor keyword data, and track your website’s overall search performance.
Setting up Google Search Console in WordPress is a straightforward process. Here’s a step-by-step guide to help you get started:
Step 1: Sign in to Google Search Console
If you don’t have a Google account, create one first. Then, go to the Google Search Console website at https://search.google.com/search-console and sign in using your Google account credentials.
Step 2: Add Your Website Property
Once you’re signed in, click on the “Add a property” button in the top right corner. A popup will appear where you’ll enter your website’s URL (e.g., https://www.example.com) and click the “Add” button.
Step 3: Verify Your Website
Google Search Console needs to verify that you own the website you’re trying to add. There are several methods available for verification, but the recommended method for WordPress websites is the “HTML file upload” method.
- Download the HTML verification file provided by Google Search Console.
- Log in to your WordPress dashboard.
- Install and activate the “File Manager” plugin or any other file manager plugin of your choice.
- In the WordPress dashboard, go to the File Manager plugin and navigate to the root directory of your website (usually public_html).
- Upload the HTML verification file to the root directory.
- Once uploaded, go back to Google Search Console and click on the “Verify” button.
Once the verification file has been uploaded to your website, a scan by the search engine giant, known as ‘GOOGLE’, will take place. Upon successful validation of the file, your domain will appear verified in their Search Console system.
Step 4: Set Preferred Domain
Do you want your visitors to view your website with the ‘www’ prefix or without it and click on the “Save” button to implement it.
Step 5: Submit a Sitemap
Using Yoast SEO, you can create a sitemap to submit to Google Search Console. Here are the steps:
- Install and activate the Yoast SEO plugin if you haven’t already.
- Go to SEO > General in your WordPress dashboard.
- Click on the “Features” tab and ensure that “XML sitemaps” are enabled.
- Click on the question mark icon next to XML sitemaps to reveal the link to your sitemap.
- Copy the sitemap link and go back to Google Search Console.
- In the left-hand sidebar, click on “Sitemaps.”
- Paste the sitemap link in the “Add a new sitemap” field and click “Submit.”
Google will now start indexing the website using the information provided on the sitemap.
Conclusion
Gaining expertise in on-page SEO for a WordPress website is essential for establishing a strong online presence. To increase visibility, provide users with an enjoyable experience, and boost SERP rankings, choose an SEO friendly theme, optimize content properly, and deploy powerful plugins. Start making use of these tactics and see your WordPress website flourish in the ever-evolving digital space.
Have questions or ready to begin? Contact us today.
Yahia Khan is a UK-educated, award-winning SEO expert and Top Rated Plus Upwork specialist, honoured with Payoneer’s 2016 Entrepreneur Award, who has successfully completed 1,000+ SEO campaigns and helped businesses worldwide boost rankings, traffic, and lead generation.